
Key:
Green - Improvements
Red - Peer Assessment
Pink - Teacher Marking
Unit 21 Editing
History of editing
Film editing is a post production process where all the directors captured footage is changed/altered in a multitude of different ways to create an end product in their own image. This process traditionally involved managing film by hand but nowadays is more commonly managed digitally with computers.
Why do we edit?
The reason filmmakers edit footage is to convey emotion, make it more interesting or just to shorten their work. A Lot of films have tens of hours of raw footage in post production but it gets edited down to as little as 1/5 of what was originally captured so that the audience will remain interested. Sometimes when movies are being made the original story can be changed in some ways due to editing.
Historical development of editing techniques
Lumière Brothers - Auguste and Louis Lumière first invented cinematography in 1895. Their earliest footage captured was of a train reaching a station. It was captured as a single film with no editing involved but lead to the later development of certain editing techniques that we still use today.
Edwin S Porter - In 1901 Edwin S Porter showed that film didn't have to be one long slide. He used footage to tell a story unrelated to what it was originally portraying.
D.W Griffiths - In 1908 D.W Griffiths film "For Love of Gold" showed the first ever use of a continuity cut. Griffiths was also one of the first people to realize how character emotion could be portrayed through the pace of editing and different angles and that film wasn't all based on peoples acting capabilities. In 1915 Griffiths directed the film 'The Birth of a Nation' which was based on a novel called 'The Clansman'. The film used camera techniques such as panoramic long shots, iris effect, still shots, cross cutting and panning shots.
Lev Kuleshov - Soviet director and film theorist Lev Kuleshov discovered the Kuleshov effect in 1920. The Kuleshov effect was a montage effect on a film which Kuleshov believed the audience would respond to more. Later a man called Dziga Vertov went on to demonstrate a montage in collaboration with Sergei Eisenstein resulting in Eisenstein's 1925 'Battleship Potemkin-Montage'. Einstein said that film montage could create ideas different from an average film.

Editing techniques
Continuity editing - Continuity editing is when the material edited is kept in sequence. This is when scenes are continuously edited throughout with no breaks in time. Using a constant sequence of quick cuts is a good way of using continuity as there will be a well paced sequence that can build the audience up for the next scene.
Non continuity editing - Non continuity editing is when time is disrupted in the sequence. If a shot were of someone reaching for a cup and grabbing it and then it cut to a different shot but the action was repeated this would be an example of non continuity editing as the time has been repeated, resulting in a break of the continuous sequence.
Cut - This is where one shot is replaced instantly by another. An example of when this is used is when characters are speaking and the shots instantaneously change between each other, as one character is speaking or as another is listening the shots would cut to show speech or emotion. Cuts are very important in cinema as otherwise everything would be all captured in one long slide. A cut can be used to keep the audience interested by showing a different perspective of scenes.
Jump cut - Cutting to a different scene forwards in time while leaving a short gap for the viewers assumption. Whilst you are editing you can use this to speed up the pace of what's happening in your film. This type of editing saves time and prevents boring the audience. It's sometimes better to have these cuts to make scenes come together more smoothly rather than one long boring scene leading up to them.
Crosscut - Cutting to a different scene backwards and forwards between each other. This may be used in a short and snappy style to show two things happening at the same time. An example of a cross cutting technique would be of one character walking towards another in an agitated fashion and cutting between them as character 1 approaches character 2. Cross cutting may also be used on one character with shots transitioning between 1st and 3rd person.
Montage - A selection of short clips compiled together to make one longer clip. A montage can be useful when showing progress in cinema. Montages are used to show the audience the progress of something and to make the pace of the message go by faster.
Linear - This is when a sequence of scenes are in order. This means that each clip follows the same timeline going forward, i.e breakfast first, lunch second and then dinner. Linear timelines are useful when telling stories so that it makes sense to the audience. If a scene were to start in the middle of a story and then cut to the start this could be confusing for the audience.
Nonlinear - This is when a sequence of scenes are not in order. This means that the piece could start in the middle of the timeline, go to the end and then finish at the start. Sometimes nonlinear
Dissolving - Gradual transition to another scene by overlapping one clip with another. This can be use to transition to another scene a lot more smoothly, this technique is often used while following some sort of story in sequence.
Fade - A fade is a visual transition used to gradually enter another scene. Fades are often used in flashbacks or dreams to show the merging of the scene into another. A fade can make the audience like they too are fading into another scene. The use of fades can make the flow of sequence feel more smooth for the audience. They also help set the scene more successfully in flashbacks for the audience as they signify the mind.
Eye line match - This is when two or more characters eye lines have been matched. This technique is often used to make the audience feel as if they're on the same level as the characters shown. An example of when this could be used is in an interrogation scene between a police officer and a convict. Keeping the camera on the same eye line of each character could be used to keep tension as they talk back and forth but if the officer were to get mad and stand up this would create emotion as that level of both characters has been changed to give the officer authority and make the convict feel small. Eye line matches are important in films as they help assist the audience into clearly seeing character emotion.

Adobe Premiere Pro
Adobe Premiere Pro is a video editing app that was developed by Adobe Systems and published as part of the Adobe Creative Cloud licensing programme. It was first launched in 2003 and was based on Adobe Premiere which was first launched in 1991. Adobe Premiere Pro is aimed at professional video editing while Adobe Premiere is aimed at the consumers market. Large media companies like CNN and the BBC have been known to use Premiere Pro and recent feature films such as Deadpool have used it for editing.

iMovie
iMovie is a video editing software app that is sold by Apple for the Mac and other iOS devices. Originally released in 1999 as a Mac OS 8 application bundled with the first FireWire-enabled consumer Mac model – the iMac DV.Since version 3, iMovie has been a macOS-only application included with the iLife suite of Mac applications. In 2003 iMovie was made free with all new Macs.

PowerDirector
PowerDirector is a video editing app that was released by CyberLink in 2001 and runs on Windows 7 to 10. PowerDirector can be used for trimming, overlaying and joining clips and effects. Furthermore it also supports new standards format such as H.265 video and 360 degree footage.
Editing Montage

Technique 1:
This is the first shot from my montage. Here we can see a POV (point of view) shot of the sixth form doors. This technique is used to make the audience feel as if they're the ones looking at whatever is in the scene themselves and not watching a recording of something. The clear view of the signs on the doors show the audience that they are entering Oak Academy sixth form. The camera is placed next to the characters cheek so that it creates the illusion the audience are in the character's shoes. This kind of technique can also be used to represent the 1st person view of more than just one character's perspective. This type of editing is known as a 'shared' POV and it represents the joint view of several characters. This editing style is effective in horror found footage type of films as it can sometimes be confusing if the character is running or in a panic which creates tension in the audience and can frighten them as they feel as if they're there.
The technique that I used here is effective as it clearly shows the audience where the scene is set and makes them feel like they're actually there. The clear shot of the signs on the door also help reinforce the location of the scene. The way that this scene has been edited creates tension in the audience as the slow paced POV of the door builds the audience up as they don't know what to expect behind the doors. The purpose of using this technique was to provide the audience with a clear view of the scene and I feel that this meets the intended purpose.


Technique 2:
The editing technique I have used here is what's called a jump cut. A jump cut is when the film cuts and jumps forwards in time by a short gap to speed up the pace. This technique saves time and keeps the audience watching and interested. In the previous scene of my movie we see the character placing his hand on the sixth form doors and then it cuts to him signing in, this is an example of a jump cut as we don't need to see Tyler opening and closing the door to know he went through it. Most films are edited in this way so that it all comes together more smoothly and isn't time consuming, if jump cuts weren't used in films it would take ages to convey anything that was gripping enough to keep the audience interested.
Even though the audience don't see Tyler go through the door they know that he's in the same area and that time has not advanced any further than him walking through the door. The audience can tell this because the environment around him has the same wall colour and carpet. Furthermore the lighting and Tyler's appearance has not changed which shows it's a simple jump cut that has been used. Jump cuts use a short time frame between scenes to skip unnecessary actions while also keeping a continuous flow. The audience remain aware of the short time skip because the daylight has not visibly advanced. The intended purpose of this technique was to keep the pace of the scene in a continuous flow and I feel the way that I edited this jump cut fulfills its intended purpose.


Technique 3:
The editing technique I used here is a quick cut, a quick cut is when a scene has short gaps between when a cut is used. This is often used when people are talking as the camera will cut back and forth between whoever is speaking. I have used a quick cut in my film after the character has signed in and runs up the stairs. We first see Tyler's legs heading up the stairs with a low-down shot and then it quick cuts to an over shot of him pacing from a different angle at the top of the stairs. In the first shot we can only see his legs but after the quick cut we can see all of him. Quick cuts are good for using a large variety of different shots and angles in one scene. This is an example of non continuity editing as in the first shot Tyler is on a different step compared to in the second.
The intended purpose of using this technique was so that audience would feel like they were moving with the character up the stairs in each cut. In this scene the character moves slightly up the stairs with the shot starting from behind him, it then cuts to in front of the character so that they have the feeling of moving with him. Rather than leaving the shot beneath and watching the character walk up the stairs I made the audience move with him, this creates the illusion of the pace being sped up even though he's walking the same distance.


Technique 4:
The editing technique used here is a match cut, a match cut is when footage is compiled together simultaneously. Here we see Tyler opening the common room door from behind and then the camera cuts to the inside of the common room showing him entering. The camera cuts just as he has his hand on the door and then when it transitions to the front view he still has his hand on the door and proceeds to open it. It's the same scene edited to show different shots of the scene that are happening at the same time. This is an example of continuity editing as the cut continues his action from the previous shot with no repeating of the action.
Continuity & Non Continuity Editing Analysis
Continuity editing is when the material edited is kept in sequence. This is when scenes are continuously edited throughout with no breaks in time to keep the same flow. Using a constant sequence of quick cuts is a good way of using continuity as there will be a well paced sequence that builds the audience up for the next scene.
This video shows the opening of a door with the first shot showing the door slightly opened and then cut showing the continuation of the door being opened from where it was slightly opened. This example of editing is good as it keeps the pace in a continuous flow that keeps the audience interested.
The way that continuity is demonstrated in this sequence is when the opening of the door action is continued from the same point after the cut.
Non continuity editing is when time is disrupted in the sequence. An example that I used was the repeat of a door being opened from different shots. Using non continuity lets the audience see actions from different perspectives.
This video shows Tyler opening the door from behind him and then a repeat of him opening the door from the inside of the room. This example of editing is good as it shows the audience what it looks like if they were stood behind him and it shows them a perspective of what him coming through the door looks like for the people from the inside of the room.
The way that non continuity is demonstrated in this sequence is when the opening of the door action is repeated after the cut.
Continuity editing test


This is a test sequence I created to experiment with continuity. In this scene we see two characters walking through a park. The purpose of the continuity editing techniques I used in this sequence was to try to harmonize the environment with the characters walking while keeping a continuous flow throughout.
In the first shot of the sequence there is an establishing shot of the environment to show the audience where the scene is set. In the second shot there is a cut to the characters legs as they walk, this shows the audience what's happening. The third shot is where continuity is demonstrated as it is a continuation of the first shot from where it last cutted. From the first three shots the audience now know where the scene is set and what is happening with the sequence while successfully remaining continuous. The cut from environment, characters and then back to environment harmonises both the action and environment without breaking the continuous flow of the sequence.
The final shot in this sequence was specifically selected to further illustrate the harmony between environment and characters. The way that this harmony is accomplished through this particular shot is by the way the branches overlap the camera and reveal the characters through them. This shot is literally a clear example of a mix between environment and characters which, based on the continuity editing, has been further elaborated to the audience. By using this technique I have successfully merged the characters with the environment while also keeping the continuous smooth action of them walking.
Non continuity test


This is an example of non continuity editing that I used to create a break in the sequence in order to keep the audience interested. This video shows two characters walking along a path with the use of non continuity in order to break their walk up and advance it further in time to keep the audience interested.
The first shot in this sequence establishes the action of them walking with the camera tracking them to reveal a point of their walk in the distance, the point in the distance sets up the non continuity cut for the next shot. Next the sequence then cuts with a fade effect to help demonstrate that there has been an advance in time to the audience. The way that the audience can identify that the characters walk has advanced further in time is because in the first shot the tree line they're walking towards can be seen in the distance and then in the second shot they are at the trees.
The fade effect that I edited into the footage was for the purpose of further illustrating the advance in time. The fade effect shows an advance in time and it is often used in cinema when a flashback is used. A fade effect can represent a faded memory which when used in film can successfully break the audiences reality of time which is a key concept in non continuity editing. By using the fade effect in my sequence the audience's attention is drawn to the process of the transition which as a result demonstrates the time advance and identifies the use of non continuity.
Film editing comparisons (Hot Fuzz & Shaolin Soccer)
This is a clip from the movie Hot Fuzz (2007), here we see Nicholas a police officer from London traveling to a remote village in Sandford to take a up a new countryside job as a police Sergeant. This scene uses multiple jump shots and quick cuts to show the busyness of the big city but as the character gets closer and closer to his rural destination the pace and cuts begin to slow down and fade into each other. This editing is good for showing how different the two settings are, the city is fast paced and hard to keep up with whereas the village is slow and calm. We also see a moment that foreshadows a later event as the Taxi moves past a church and we see a flash of thunder behind it signifying death. Furthermore the repetition of the characters continuous unsatisfied face we see as he travels illustrates his discontent with the whole move. Continuity editing is used throughout the example scene to show the character travelling.
This is a scene from the movie Shaolin Soccer (2001), here we see a group of brothers/monks that reach enlightenment after being shamed when losing a practice game of soccer. Special effects are used in this scene to illustrate the power of Shaolin but one of the main things noticeable are when each brother opens their eyes and we see a blast of fire behind them. This symbolizes the power that they each have and the awakening of that power within as they open their eyes (eyes opening represents awakening). A technique we see in this scene that is also used in Hot Fuzz is repetition, as each brother awakens they all have the same blast of fire behind them which is the repetitive use of the same special effect to illustrate the same individual point for each character. Also in the first shot of the video we can see the clouds sped up. Clouds represent the mind and purity so the editing of the clouds being sped up represents the characters pure state of abstract mind being enhanced.
Analysis of The Cat In The Hat - turned horror
This trailer illustrates the power of editing and shows how a childhood classic can be made into a horror. The cat in the hat is a children's film about, a cat in a hat. The movie tells the tale of how two socially outcast children become friends with a humanoid cat and get into all kinds of antics with each other while avoiding the kids bully stepfather. The movie is a family friendly childhood classic and known for Mike Myers hilarious acting. The trailer above however shows that just by editing certain scenes together with some scary music that even the friendliest of kids movies can be manipulated into being a terrifying horror.
Scenes where the kids look frightened or where the cat looks menacing have been specifically divided to portray the cat as a villain. This is a good example of why when making a movie you should be aware of character emotion and how they could appear to the audience in certain scenes. Another example is how lighting and audio has been used to convey emotion in the audience, all the bright colours in this trailer have been filtered to appear darker and as a result set a more frightening scene that creates fear. Dark colours are often associated with death or sorrow which sets the scenes up in this trailer to be more frightening to the audience. Loud noises and dramatic music have been edited over scenes in this trailer to assist the audience into being scared. Furthermore the way that the music has been edited with the scenes assists with the end climax, as the trailer goes on the the scenes become more intense with the music until there is one final jump scare at the end to finish it. Quick cuts are also more repeatedly used throughout as the trailer intensifies, this can build the audience up to feel anxious as the quick cuts can be confusing. Each cut is of the cat appearing menacing or evil, we see him holding a baseball bat to a child and holding a syringe with acts as a bonus scare factor to anyone who has a phobia of syringes and watches this trailer.
Overall this trailer shows us how when you apply certain techniques that are commonly used in one genre to another that there is a dramatic change in how the entire segment comes across. The trailer demonstrates how a children's film can effectively be portrayed as a horror with the right editing skills and techniques.
Disturbia (Horror/Thriller, 2007) Analysis
A short overview of this film is that a kid played by Shia LaBeouf is under house arrest for assault and he begins to spy on his neighbors from his room in order to entertain himself. The story takes a dark turn when he witnesses what looks like a murder committed by his neighbor across the street. From here Shia becomes obsessed with convincing everyone of the murderer and begins to spy and investigate from his room and even goes as far as having his friend break into his neighbors home to gather evidence. A lot of the shots and editing techniques used in this movie revolve around everything Shia sees from his room. Some of the investigation is captured as found footage by Shia using a personal camera.
Techniques used in this film include found footage, this type of editing is effective as the camera used can often be handled in a violent way making the audience feel more vulnerable. It is also edited to show interference when held which makes scenes more edgy. This type of editing can be done by ametuer movie makers as professional equipment is not required for this type of editing. If the editing looks messy in this type of technique the director can easily say that it is a reflection of more authentic found footage. This type of panicked camera movement is perfect for my film as it can be shot from the characters perspective to make the audience feel as if they are involved.
The editing techniques in this film build an emotional response in the audience by making them feel like they're in the characters situation with him. The audience are more susceptible to techniques that relate them to the film because it's natural for people to feel more sympathetic if they can picture themselves in a certain outcome. Throughout this film the found footage editing techniques sync the audience emotions with the characters on screen because it's good at manipulating them into thinking they're the ones in the dilema.

This is a shot from the film where the killer is exposed. In this scene Shia is crouched behind his window and rises his camera above and pans along his neighbor's window to see him stood there. The editing in this shows the killer and then quickly cuts back to Shia panicking after noticing the killer had caught him. The quick cut that is used in this scene is accompanied by a loud burst of audio which is used to make the audience feel panicked just as the character is, using the loud sound makes the audience feel like they have also been spotted by the killer as they will automatically feel startled due to the loud noise. By editing this scene to make the audience startled an emotional response is triggered in them to give them a rush of adrenaline and as a result make them feel emotionally connected to the scene.
Music video for television - Aphex Twin - Come to Daddy (1997)
This is a music video for Aphex Twin's "Come to Daddy" which was released October 1997 and directed by Chris Cunningham. The editing style and techniques in this video heavily reflect the genre of the song and the type of themes that people enjoyed back then. There are multiple uses of non-continuity throughout this video that are made by multiple flashes of Aphex Twin's face and his signature logo. The constant flashes throughout this production make the audience feel as if they are in a rave which is where this type music would have been played at the time. I could use similar editing to make my film more theme relatable.
The shocking nature of this trailer represents the music artist. The old lady that's in this piece reflects the horror of audiences that havent seen the trailer before, and the monster that screams in her face represents the artist. Old people can represent innocence and the monster in this reflects evil. The children are a representation of the audience that have already witnessed this piece as they have been corrupted by its horror.
There's a common viewpoint that music videos and other types of short form video aren't as much as an artistic expression as other forms of filmmaking, but in my view all cinematic expression is equal. Music videos just abide by a different cinematic language, they tell stories to convey emotion in a different way. I think it's important that during my research on what makes trailers good that I consider music video editing techniques.
Tokyo! (2008) scene analysis
This video is from Tokyo! a 2008 anthology film containing three segments written by three directors. This is "Merde" directed by Leos Carax. In this particular video once the sewer man leaves the sewer he walks for over a minute before there is a continuity cut. This type of sequence is an example of continuity editing that can result in a large well-paced continuous flow. If the pace of my footage looks good enough then I could have a similar sequence.
Continuity is demonstrated in this sequence at 1:48 when the character pushes past two people and there is a cut. The start of the continuity action is him walking towards the two people and then after the cut he continues to walk as he pushes past them. It seems that the reason this particular cut was used was to give the actor a break since he had been walking for over a minute with no cuts prior to this point and to keep the sequence of him walking continuous. By using continuity here they gave the opportunity for the actor to catch up on the choreography of him walking while keeping the sequence in a continuous flow.
The reason that continuity is used in cinema is to create the illusion of a continuous action remaining continuous after a cut without the transition between the shots being noticed by the audience. Tokyo! effectively creates the illusion of the sequence of the character walking remaining continuous after the cut because of this technique.
Editing trailer for my film - themes, techniques and reasoning

The initial ideas of the editing techniques I could use for my trailer were based on the themes of my film. The music that I wanted to edit into my trailer was to do with friendship as that's one of the themes. I also figured that I would use red filtering to illustrate blood, relating to the theme of death/murder. Often audiences are intrigued by drama relating to death so by using editing techniques relating to this theme suspense could be created in the audience causing them to wonder what comes next. Furthermore I wanted to use fading techniques to relate the drama to ghosts. The main reason that I want to use these themes in my drama is because I feel they are the best types to make it 'dramatic'.
General script of the sequence

This shows an idea of my sequence individually as different text boxes and indicates the corresponding actor in each scene with colour and illustrates how I want it to play out in the sequence. Tyler who plays the stalker in my movie is allocated as red and myself who plays the victim is indicated as blue.
Released Trailer
This is my final sequence for my film. Beneath are the editing techniques I used in the sequence justified in detail about how and why I used them.
Tint editing technique


This shows how I edited the tint effect into my trailer to relate to the theme of the film. As I specified in my initial popplet ideas I felt that using a red filter would be a good way of showing the theme of murder as red represents blood and blood is associated with murder. As the attacker lunges towards the victim the colouring is normal and then when the knife reaches the victim the tint changes to red to illustrate that the character has been stabbed and is bleeding.
The adjustment layer is used to make the effects that I used effects more flexible. The footage that has no adjustment layer above is normal and the footage that has the adjustment layer is tinted. The way that this makes editing more flexible is by allowing one effect to be dragged over an entire row of footage that needs the same effect. This saves time because instead of having to individually assign the effect to each segment one by one it can be done with the adjustment layer.
The red tint clearly illustrates to the audience that the character is bleeding and when someone bleeds it can be quite scary if you're not used to it. The emphasis on the red in the sequence can make the audience feel panicked like the character. Because the whole screen is covered in red the audience know that it's been a serious attack as the more blood (red) that you can see represents that the injury is deep. If you (the audience) has ever fell over and injured themselves then they will know that the more blood there is the more it usually hurts.
The overall reason of why the character was made to have a short chase while bleeding out was to create an emotional response in the audience. Often when audiences see someone injured they feel sympathy so instead of just having the victim immediately killed the chase allows the audience to build a short emotional connection with the character which is triggered by seeing him in pain and trying to escape. The red tint is a clear indication for the audience that the character is in distress which triggers a sympathetic distress in them as a result.


Here I used the tinting adjustment layer technique again but this time with another colour representing a different theme. The first adjustment layer over the footage is the red tint and the second layer is a black and white tint. The red tint shows the audience that the character is bleeding and in a panicked state. The black and white tint shows that the character has now died. The reason black and white is a good tint for showing death is because the lack of colour represents the lack of life. Dark colours are usually associated with the grim reaper and funerals which links with the dramatic theme and what is trying to be portrayed in the film.
Furthermore I changed the speed of the shot as the character is stabbed to represent time slowing down in the character's perspective. The reason I used this technique was to make the death more personal for the character and the audience. The speed being slowed down represents the characters life flashing before his eyes. Also after real life trauma people can recall the events playing slower in their heads as it happens. By making the death more relatable to a real life occurrence the drama is more 'real'. It's easier to make audiences care about characters if it's relatable.
A similar red tint editing technique can be seen being used in this 2015 horror film "The Gallows". This editing technique also relates back to the theme of murder just like in my sequence.
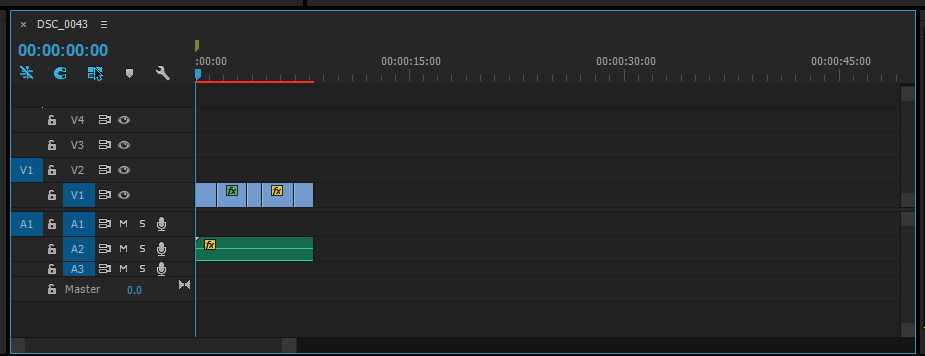
Segment lengths


The length of the footage in between the cuts in my edited piece can affect the pace of the film and also affect the audience's emotions and interest. The start of the trailer has longer segments as this builds the audience up and gives them time to process the characters, environment and overall scene. This is shown in the image above by larger segments in the first half of the trailer and shorter in the second half. This technique is quite effective as it gives the audience time to process the trailer and then drama can come in the form of quick cuts to keep them interested in the second half. This type of pacing technique can be seen in a lot of films as audience relationship with the characters needs to be built for the drama to have any effective meaning to them.
In this segment I left a dramatic pause to affect the continuity of my piece. Leaving this gap builds tension within the audience. This type of editing is used in horror films right before a jump scare. The pause in the sequence is how tension is built as the audience don't know what to expect. The short time gap specifically builds the tension because the black screen can be associated with the unknown. Death can be foreshadowed by the sudden darkness of the screen as darkness is associated with death.
The dramatic pause gives the audience time to reflect on what has just happened in a scene. By leaving a pause after a scene and changing the continuity, the audience are forced to replay the scene that has just happened in their head in order to try to comprehend what is about to occur next. By making the audience think about a scene an emotional response is triggered which is the tension. In some cases if you're just showing scene after scene in quick cuts then it can be difficult for the audience to really take in what's happening which reduces the chances of a triggered emotional response in them. By leaving the gap in between a scene it just gives the audience time to catch up with the drama in their head.

Credits

These are the credits for my trailer. This is a formality that has to be put into trailers for production purposes.